Your kegg Start-up Guide
We’re truly honored to be part of your fertility journey. We understand that trying to conceive can come with its ups and downs, and we’re here to support you every step of the way.
This guide is designed to help you get started with kegg with confidence. If you have any questions along the way, don’t hesitate to reach out — our team is always here to help.
Let’s get started!
Getting started
with kegg
Getting to know the kegg app
Understanding your kegg data
Charging, cleaning + storing
**THESE ALL NEED TO BE EDITED
Long or Irregular Cycles
Frequently asked
questions
Taking your readings
Charging, cleaning + storing
Chart understanding
Irregular cycles or PCOS
FAQs
Getting Started with kegg
Connecting your kegg app
You will need:
Your kegg device
Your kegg charging cradle
Your kegg charging cable
A USB charging block (plug) from your house
Your mobile device with an internet/data connection
Download the kegg app
In your phone's app store, search "kegg." Follow the download instructions.
Unbox your kegg and charger
Every kegg comes with your kegg device, charging cradle, and charging cable which will need to be connected to a UL listed charging block.
Plug the charging cable into the charging cradle
Push firmly to fully insert the appropriate cable end into the charging cradle.
Connect the cable to a charging block
Plug the USB end of the charging cable into a UL listed charging block and then plug into the wall.
Insert your kegg into the charging cradle
Be sure to press kegg down into the cradle, as kegg’s metal-plated tips need to connect with the metal contacts at the bottom of the charging cradle. Your kegg will gently pulse a warm yellow while charging. When your kegg is fully charged, it will glow green.
Ensure your device has its bluetooth low energy connections enabled
Bluetooth 4.0 is required for kegg functionality.
Setting up your account
After downloading the kegg app:
Open the app, and select “Sign Up” to create a new account. If you have an existing kegg account, select “Login”.
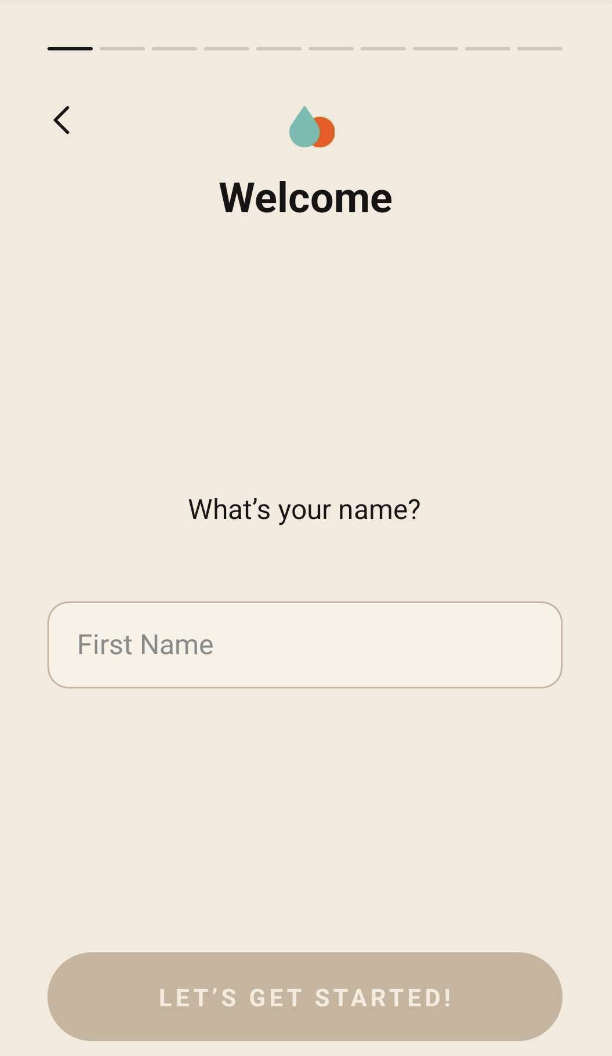
Follow the prompt to input your personal information.
Next, you will be prompted to pair your kegg:
Follow the in-app instructions.
Allow the app permission to connect with your kegg.
Note: You do not need to take a reading at this time. Be sure to take your reading during your target time each day.
When to start kegg
Get Started
It is preferable to begin kegg use the day after your period ends. If you receive your kegg mid-cycle, you may begin using kegg on any non-bleeding cycle day. You do not need to wait until your period ends after the start of a new cycle if you wish to use kegg before your next cycle starts.
Consistency is key
Consistent daily kegg use is key to tracking your cervical mucus and identifying your fertile days. It is especially important that you take a reading on the first 3 days that follow the ending of period bleeding, as this allows kegg to establish the baseline for your cycle.
Choose a target time
For the most reliable and personalized insights, your kegg readings should be completed within the same two hour window each day.
Your two hour reading window extends from one hour before to one hour after your target time. You can take your reading anytime in this two hour window.
Example: If your target time is 9am, you should take your reading anytime between 8am and 10am.
If you cannot take your reading within that timeframe on a given day, you can proceed with your reading.
A kegg reading should not be taken within 8 hours after intercourse.
How to take your reading
Find a comfortable position to take your reading
You can take your kegg reading while standing, sitting, or laying down. For the most reliable results, take your reading in the same position each day.
Make your selection in the kegg app
When it is time to take your reading, select the + in the center circle of the Home screen. Make a selection (kegels & kegg reading, or the kegg reading only.)
Turn on your kegg
When prompted to do so by the in-app prompts, press the power button on the side of the kegg to turn on your kegg.
Insert your kegg
When instructed by the app, insert the kegel ball portion of the kegg fully into the vagina. The tail should remain outside and facing forward on the body. To aid in insertion, you may rinse your kegg in warm water. Lubricants should be avoided.
Remove your kegg
When the reading is complete you will feel two vibrations and the app will prompt you to remove your kegg. Hold your unwashed kegg near your phone and follow the prompt to save your kegg reading.
Wash your kegg
Once your kegg results are displayed in the kegg app, you may wash your kegg. Using warm water (and a mild soap if desired), gently wash your kegg, taking care around the metal portion of the kegg to avoid scratches.
Store your kegg
Allow kegg to air dry (or use a soft cloth to carefully dry, again taking care to not scratch the metal surfaces of the kegg). Store kegg somewhere safely, out of reach out pets and children.
Note: kegg needs to be fully dried before placing in the cradle, as moisture or wetness can cause damage to your kegg.
Charging, cleaning and storing your kegg
Charging your kegg
Insert the cable into the charging cradle. Push firmly to ensure the cable is fully inserted into the cradle.
Insert the other end of your cable into a UL listed charging block and plug it into a working wall outlet.
Insert your kegg into the charging cradle. Be sure to press kegg down into the cradle, as kegg’s metal plated tips need to connect with the metal contacts at the bottom of the charging cradle.
When charging, your kegg's light will gently pulse a warm yellow. When charging is complete the light will glow solid green.
Cleaning your kegg
After each use, gently hand wash your kegg under warm running water. You may use a mild soap if you wish. Ensure to take extra caution washing the metal bands and tip to prevent scratching and damage. To avoid damage to your kegg, avoid hot water, and ensure kegg is fully dry before charging.
Storing your kegg
When not in use, store your kegg in a safe place where it can freely access air (and away from animals who tend to love kegg as much as we do!)
For long-term storage, do not store kegg in an airtight container or bag. You can safely store kegg in a soft satchel or sock.
How often should I charge my kegg?
Charge your kegg when prompted to do so by the app. The battery will last several readings on one charge, and for maximum battery life, kegg should not be charged daily.
Getting to know the kegg app
The Home Screen
Use the Home screen to start you reading by selecting the + in the center circle. The app will guide you through taking your reading. After your reading, your score will be displayed in the Daily Details screen. You can also view this score in the Home screen and your Cycle screen.
Kegel Exercise Ring
Surrounding your Fertility and Cervical Mucus Score on the Home screen is your kegel exercise ring. If you elect to complete your kegel exercise routine before taking your reading, this ring will automatically fill for the day.
Daily Supplements Intake
The outer ring allows you to track your daily supplements (if applicable). To track your supplements for the day, navigate to the + in the orange circle on the Home screen, then select “Add My Supplements.”
Cycle Data
Below the circles on the Home screen, you will see cycle data, including your Cycle Day, Chance Of Getting Pregnant, and Fertile Window or Period prediction. The cycle day is based on the start of your period, while the Chance Of Getting Pregnant and Fertile Window or Period predictions are based on kegg’s predictive algorithm.
kegg Reading Habit Tracker
The kegg app will automatically track your daily kegg use. After you take a reading, you will see a check mark appear for the day in the kegg Reading Habit Tracker, below the circles on the Home screen. Aim for consistent check marks for the most personalized kegg experience!
Adding Daily Details
Use the + in the orange circle, then select Add A Note to input cycle details such as Sex (or insemination), temperature, Cervical Mucus Observations, Urine Test results, or Notes.
Add/Edit A Period
Use the + in the orange circle, then select Add/Edit Period to add or edit a period. To input a period, select a calendar day. To delete a previous period, select the trashcan icon for the associated period days you wish to delete.
Understanding your kegg data
A quick look at your fertility data
Don't have a lot of time to learn the ins and outs of your cycle insights? We've got you covered with the basics here.
When you take a reading with kegg, you’ll see a few key indicators to help you know when you’re most fertile.
Fertility Level (Low / Medium / High)
Shown right after your reading—this tells you how fertile you are and is based on your Fertility and Cervical Mucus Score.
Fertility & Cervical Mucus Score
This score (0-100) shows the changes in your daily fertility status.
The higher the score, the more fertile that day is.
Fertile Window
Highlights all potentially fertile days
Light green rectangle = Fertile Window
Green Shaded Window = Peak Fertility
Impedance Line (Black Dashed Line)
The impedance trend shows the real-time changes in your cervical mucus and takes the shape of a valley during your fertile window.
Can be toggled on/off on the Cycle screen.
Downward movement of the impedance trend in or near your fertile window prediction suggests your cervical mucus is becoming more fertile.
Note: The impedance trend is not your basal body temperature. If you track your BBT, you can input your temps into your notes, or sync the kegg app with your Tempdrop device.
Ovulation Probability
Predicts how likely you are to ovulate on a given day.
Can be toggled on/off to display likely ovulation days on cycle view
Appears as blue bars as your fertile window progresses.
Remember: you are most fertile on the days before ovulation, not on ovulation day itself! Let your Fertility and Cervical Mucus Scores and peak fertility days lead you!
Keep reading below to dive deeper into your insights.
Your Fertility and Cervical Mucus Score
The Fertility and Cervical Mucus Score (0-100) shows you the changes in your fertility status. Here are a few important notes:
An increasing score indicates increasing fertility.
Once you are fertile, your score will display in the green outlined fertile window.
As your score increases, your chance of conception for a given day also increases.
Decreasing scores should still be considered fertile when in the fertile window. The score accounts for the days that are most fertile.
A score of 5 or less suggests a low fertility cycle day.
Your Cycle View
To access your cycle data, click Cycle on the navigation located on the lower part of your app screen.
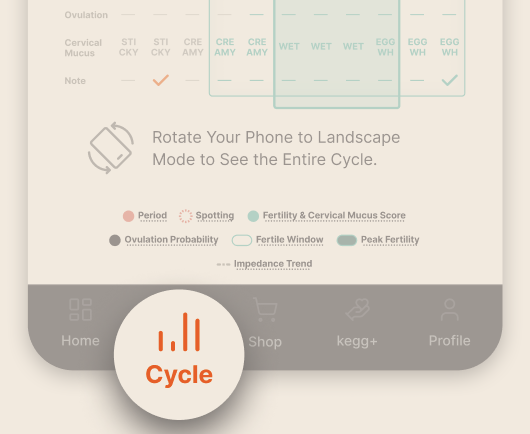
Your Cycle view allows you to see the trend of your Fertility and Cervical Mucus Scores (displayed as bars), as well as your impedance trend, ovulation probability, cycle details (if recorded), and basal body temperature (if recorded).
Use the Cycle Compare feature to compare your past 3 cycles.
Basal Body Temperature Display
If you track your basal body temperature (with a separate device), you can input this information into the kegg app by selecting the + in the orange circle→ Add A Note → Select Option under Temperature in the Health section.
To toggle the temperature display on/off, navigate to Cycle → Temperature (in the upper right corner).
The Fertile Window Display
The fertile window on your kegg cycle view will appear as a light green outlined rectangle. Based on your historic data, including the information entered at account set-up, and past recorded cycle data (if applicable), kegg is able to predict when you will likely be fertile before taking any readings within a cycle.
As the cycle progresses and you take your daily kegg readings, you will see your Fertility and Cervical Mucus scores be plotted on your cycle view in the form of vertical bars.
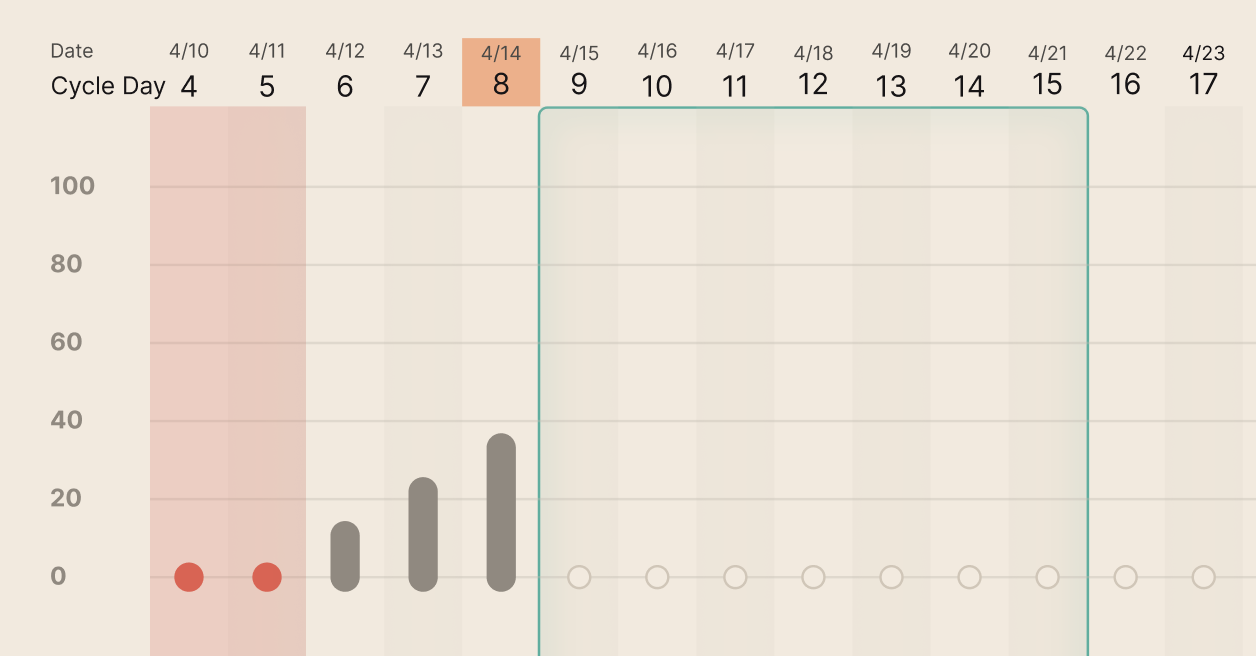
kegg’s intelligent algorithm is designed to capture all of your fertile days, so you can plan with confidence and maximize your chances of pregnancy.
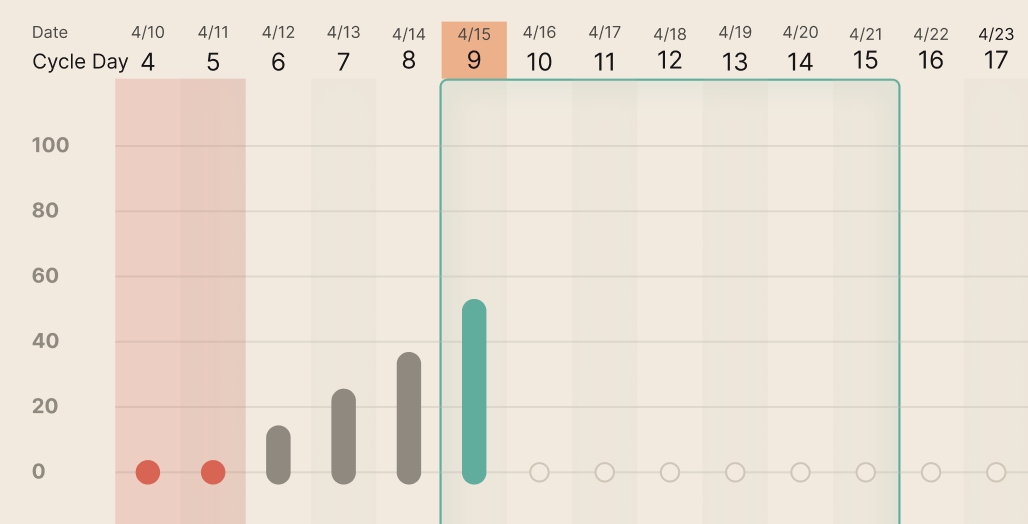
When you enter your fertile window, this means
The app will indicate you are in your fertile window (in the home screen, cycle view, and calendar displays)
Conception may result from trying on these days.
The days leading up to your fertile window are not likely fertile, although you may see them steadily increasing as you approach your fertile window.
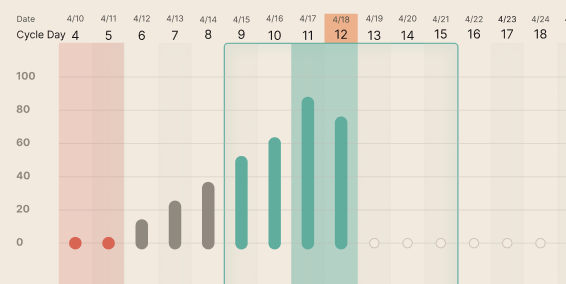
The Peak Fertility Window
The Peak Fertility Window makes up your most fertile days, based on your Fertility and Cervical Mucus scores.
In order to gain the insight of your peak fertile days, consistent daily kegg use is necessary.
Your peak fertile days are identified by green shading. You will see green shading behind your daily Fertility & Cervical Mucus Score bar in the cycle display. Your next reading will determine if another peak fertile day proceeds the previous one.
The peak fertility days are displayed with consistent kegg use. Peak fertile days will not display with inadequate use.
If you do not plan to try on everyday within your fertile window, aim for a day (or days) within your Peak Fertility window for the highest chances of pregnancy.
The Ovulation Probability
The Ovulation Probability reflects the probability that ovulation will occur on that given day. A day with a higher probability is associated with a higher likelihood of ovulation occurring on that day. The distribution will be more refined with consistent kegg use.
If your Ovulation Probability is toggled on as your fertile window is underway, your ovulation probability bars will appear.
The Ovulation Probability bars are intended to help you identify your most likely ovulation days. However, the most fertile days are those that lead up to ovulation, not ovulation day itself. Intimacy efforts should be timed according to your fertile days, particularly those in your Peak Fertility Window.
kegg Impedance Trend
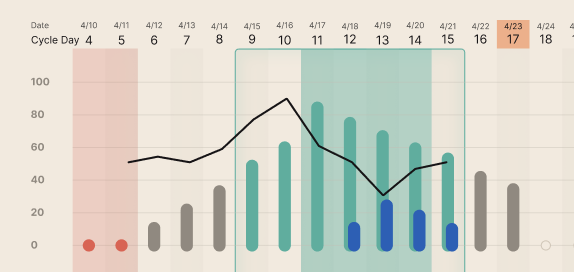
The impedance trend, a dashed-black line, reflects the day to day changes in your cervical mucus.
The fertile days each cycle appear as a valley (or a dip) in the impedance trend.
As the mucus becomes increasingly more fertile, the readings descend on the y-axis. The readings will begin to rise upwards when the fertile window begins to close.
The full duration of this valley should be considered fertile.
Your historical impedance trend is factored into your Fertility and Cervical Mucus Score.
This real-time feedback of your cervical mucus helps you see precisely when your cervical mucus is most fertile.
If this is your first cycle using kegg or if your cycles tend to be irregular, you may see your fertile valley in your impedance trend form slightly outside of your fertile window prediction. As you use kegg consistently, your predictions will become more personalized to your unique trends.
Note: the impedance trend line is not your basal body temperature. If you track your basal body temperature, you can input your temperatures into the notes using the + in the orange circle.
FAQs
What day do I mark as the first day of my cycle?
Day 1 of your cycle is the first day of blood flow. Spotting does not begin a new cycle.
Where is my first kegg reading?
After your reading you will see your Fertility and Cervical Mucus Score and chance of getting pregnant. On the Cycle View you will see your Fertility and Cervical Mucus Score as a bar on the chart. Note, if your score is <5 the bar will be very small. Your impedance trend will also be plotted on that day, which will connect to the next day's reading once you take another reading.
What does a score of less than 5 mean?
A score of less than 5 is a low chance of fertility day as the probability of pregnancy resulting from intercourse or insemination taken place on that day is less than 5%.
Is my prediction accurate on my first day of kegg use?
For your first full cycle with kegg, your fertile window prediction and fertility and cervical mucus scores will be based on the historical data input during account set-up. Even without your baseline trends, kegg is able to predict your fertile window. Throughout your first full cycle, your baseline trends will be established, and in your next cycle, kegg will use your real-time cervical mucus data as part of its prediction and the Fertility and Cervical Mucus Score calculation. Your personalized insights are dependent on consistent kegg use.
Use kegg on
How do I find my most fertile day(s)?
The days in your peak fertile window (green shaded window) are your most optimal days to try to conceive.
The higher the Fertility and Cervical Mucus Scores are associated with a higher chance of resulting in pregnancy. The impedance trend will continue to reveal the changes in your cervical mucus.
Aim to time your efforts when your Fertility and Cervical Mucus Scores are high and your impedance trend is forming a valley.
Will my fertile window prediction change with each reading?
The fertile window prediction is made at the start of a new cycle. While the fertile window may expand as your cycle progresses, the position of your fertile window will not change during or after your cycle.
I am seeing more dips in my impedance trend after my fertile window. Does this mean anything?
It is common to see fluctuations such as valleys and hills in your kegg readings before and after your fertile window. Cervical mucus undergoes numerous changes throughout your cycle and the impedance trend reflects these changes.
Unlike basal body temperature, kegg readings do not need to remain elevated after the fertile window. Consider any valley during the timeframe your fertile window is expected as potentially fertile. After your first full cycle with kegg, your cervical mucus changes will be factored into your Fertility and Cervical Mucus Score.
If you suspect you did not successfully ovulate during your fertile window prediction, continue to watch for valleys in your impedance trendline and consider those days as potentially fertile.
If your estimated cycle length is longer than 40 days or shorter than 21 days, there will not be a fertile window prediction displayed for the current cycle.
You can view your estimated cycle length in the Cycle View under “View Cycle Stats”. Continue to watch for valleys in your trendline and consider those days as potentially fertile.
If you had a cycle that was atypical for you (due to anovulation, pregnancy, pregnancy loss, in the postpartum period, etc) you can tell the kegg app to not factor this cycle length into your prediction by navigating to Cycle, View Cycle Stats, then Exclude Cycles. Select the cycle of atypical length.
If your cycle exceeds kegg’s predicted cycle length, kegg will display “fertility” with a “--”. If a new period is added, and your estimated cycle length is within 21-40 days, you will see a fertile window prediction in the new cycle.
Can I add temperature tracking?
Yes! You may optionally input your basal body temperatures (BBT) in your daily notes.
On the kegg chart, you may turn on and off the temperature display by tapping on the small thermometer icon in the upper left hand corner of the cycle view.
If you are a Tempdrop user, you can sync your Tempdrop to the kegg app to view your temps and kegg data together. Navigate to Profile then Apps & Services to set-up the integration.
Can my kegg readings indicate if I am pregnant?
No. There is no specific trend that indicates if a user is pregnant or not, and pregnancy charts can vary greatly among kegg users! It is normal to see variation in kegg readings in the luteal phase both in pregnancy and non-pregnancy cycles.
Congratulations! Log your pregnancy test results in the kegg app and discontinue kegg use.
Where are my app settings and what can I access?
Access kegg's settings by navigating to Profile then Settings. In the Settings you can update your personal data and change the app appearance.
User Details
You can update your user details anytime under the User Details section, including your name, name, date of birth, height, and weight.
Cycle Details
You can update your cycle details in the Cycle Details section, including your cycle regularity, typical cycle length, period length, and most recent period.
Medications & Supplements
You can update your current fertility related medications (and some supplements) in the Medications & Supplements section.
My Conditions
You can update any related fertility conditions in My Conditions.
Why I’m Using kegg
You can update you fertility tracking purpose under Why I’m Using kegg
App Appearance
Select between Light mode/Dark Mode or according to your phone settings
I used the previous app. Where are my kegg readings?
The new kegg app features several new insights, such as your Fertility and Cervical Mucus Score and the Ovulation Probability. You can still see your kegg readings (as displayed on the previous kegg app) with your impedance trend.
When you are in or near your peak fertile days, your impedance trend will begin to take the shape of a valley. As the cervical mucus becomes more fertile, the kegg readings will begin moving downwards on your cycle display. This real-time feedback of your cervical mucus helps you see when your cervical mucus is most fertile.
Can I use kegg if I have irregular cycles?
The new kegg app is normed against women with ovulatory cycles. Our research shows that women with ovulatory cycles typically have cycles between 15-45 days in length. The fertile window prediction and Fertility and Cervical Mucus Score is intended for women with cycles within that range.
If your cycles are consistently longer than 45 days in length, you will want to use the impedance trend to see your real-time cervical mucus insights and to optimally time your trying to conceive efforts. Aim to time your efforts during the valleys that form. When you begin to see your readings descending downwards about around 3 weeks before your next cycle start, assume you have entered a fertile window. If your cycles are highly variable, you'll want to watch for valleys forming during a wider range of cycle days.
If your cycles are greater than 45 days consistently, we recommend consulting a healthcare provider, as ovulatory cycles are less likely when cycles are greater than 45 days in length.
Cycles shorter than 15 days are most often anovulatory. If you are consistently having cycles 15 days or less, we recommend speaking to your healthcare provider.
